This is going to be a strange opening sentence for this post, but to be perfectly honest, I often steer away from using ANY kind of wood stain if I don’t have to; this includes water-based wood stains. Let me explain:
See, I love the look of natural wood in all its variations, and for me, bringing out the natural beauty of the figure and colors in my furniture is the best approach to the finishing process.
So, using a combination of Target Coatings EM1000 Sanding Sealer and any one of the fabulous clear topcoats, like EM8000 Conversion Varnish, consistently yields fantastic results and I couldn’t be happier.
However, I must admit this doesn’t always work for every situation.
For example, what if I like the look and color of walnut wood for trim in my house?
Getting window and door trim in walnut wood is possible, but the price can hit the wallet hard and you have to wonder if it’s really worth the cost.
A more affordable wood like pine, poplar, or oak with a beautiful stain can be a cost-effective and eye-catching option.
What about the customer who wants an antique look for their project and doesn’t want to wait 30 years for the wood to naturally take on the aged look?
Or, someone who likes the figure of cherry or maple, but wants more visual “pop” than a clear coat can typically provide?
These are just some of the reasons why you might want to leverage the versatility of water-based wood stains before application of a water-based clear finish.
A New Breed of Water-Based Wood Stains
Let’s be honest: in the past, water-based wood stains were extremely difficult to work with.
They had low workability, dried too quickly, and created lap lines easily.
And, if you planned to apply a water-based topcoat without first applying a barrier coat over the water-based stain, you had to be very careful with your topcoat application technique.
For these reasons, oil and other solvent-based stains have maintained a dominant edge in the finishing market.
Unfortunately, even with market pressure for low VOC formulas, oil-based stains are still very smelly and hazardous for you and the environment.
Due to the long drying time, the smells can linger for days, causing headaches and nausea for many people.
They also pose a fire hazard in your shop — extreme care must be taken during cleanup so application rags don’t overheat and spontaneously combust.
The good news is, there have been some innovations in water-based stains over the years and I think Target Coatings’ NR4000 Stain Series is at the forefront of these improvements.
Not only are the NR4000 stains made from a renewable and biodegradable Natural Resin, they also pose a significantly smaller risk when you use them.
And they’re not just safer — they perform!
The very small particle size of the resin allows for deep penetration into the wood grain fibers, highlighting the grain figure, and creating a richness of color that rivals oil based stains.
They are also, in my opinion, some of the easiest stains to work with. There are multiple application methods and an amazing workability that will make most jobs simple.
Lets take a deeper look and see how you can move away from oil-based stains and / or start getting stunningly beautiful results from these water-based wood stains that are safer for you and the environment.
Coloration and Application
Let’s start with the main features and benefits of using NR4000 stains.
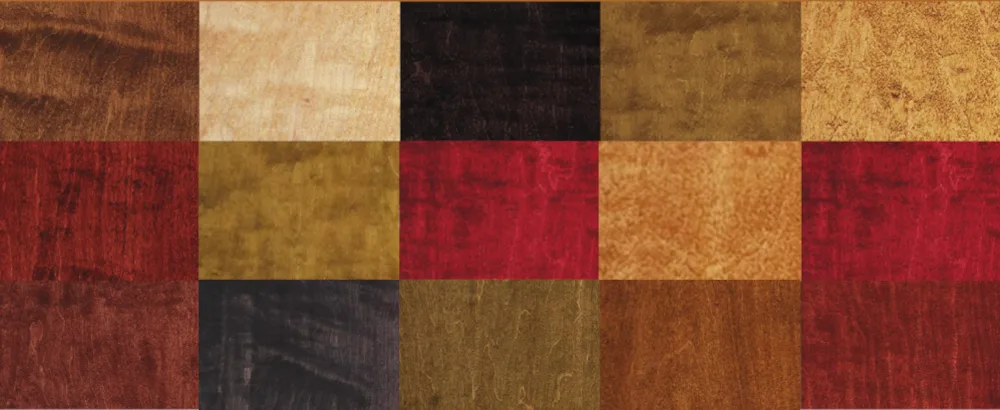
First, there are 11 fade-resistant colors. These colors can be used as-is or they can be further tweaked with a water soluble dye or pigment.
There is also a Clear-Base option that can be used to impart a light straw color to your wood similar to a 1lb. cut of blond shellac.
Or, you can create your own custom color. Transtint dyes, Mixol and Golden Fluid Acrylic pigments, as well as water-soluble dye powders pre-mixed into a concentrated solution all work well with the NR4000 formula.
The workability of this stain is amazing. You can apply it with a spray gun, roller, brush, or even a rag.
It’s possible to spray without wiping, although I’ve found that two light coats with a small amount of back wiping with a clean cloth works best on large surfaces.
In warm conditions, water or SA5 Retarder can be added to extend the drying time which makes hand application on large flat surfaces much easier.
And even if you get some lap lines or dark splotchy areas, you can use a spray bottle filled with straight water or water and alcohol mixed 1:1 to re-soften the stain and even it out over the surface. (I’ll provide more tips like this in Part 2).
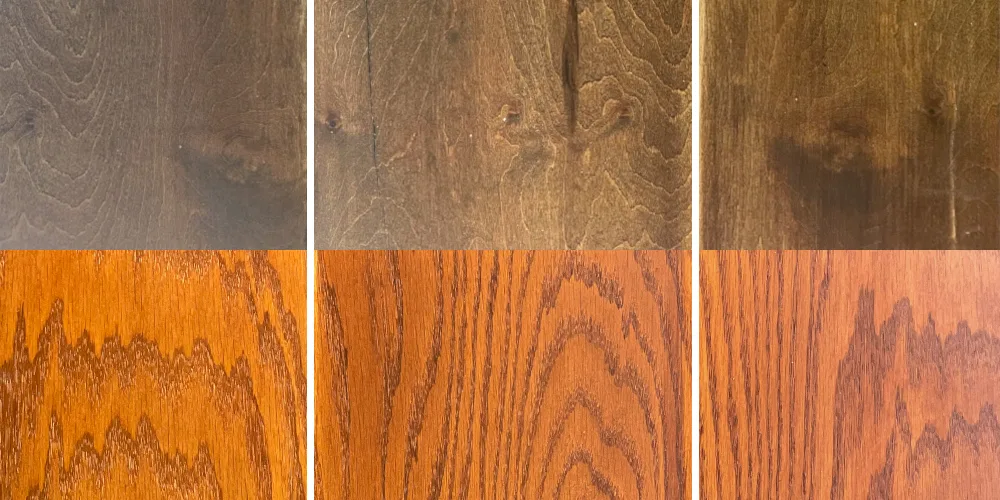
Below are some pictures showing hand applications using different techniques on the same board. The top color is Dark Mission Oak and the bottom color is Golden Oak.
As you can see, there are very little differences in overall look between the different applications:
As far as NR4000’s performance on different wood species, I’ve found its penetrating formula gives a rich and deep color to almost any type of wood.
Most pigment stains on the market struggle with providing good color over hard, closed-grained woods like maple. And while dye stains do a good job of coloring the wood, they don’t always accentuate the grain in open grained woods like oak.
I’ve found that the NR4000 stains are good at both. They provide rich coloring to closed-grained woods like maple and accentuate grain patterns on oak.
I’ve even found NR4000 stains to be less blotchy on blotch-prone woods like cherry and maple as compared to other stains. However, if you really don’t like blotchiness, I’ll provide additional tips in Part 2 to avoid blotchiness.
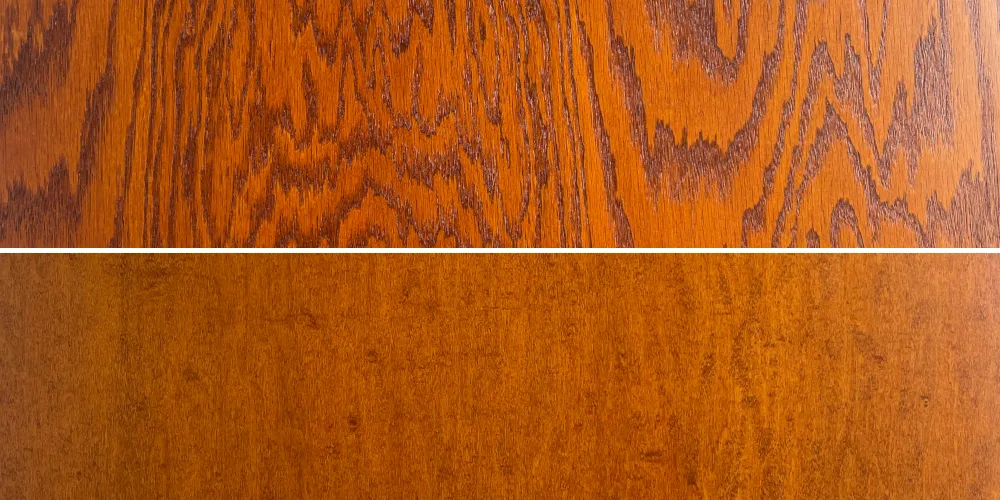
Here are samples of NR4000 in the color “Golden Oak” applied to Red Oak and Maple:
Finally, one of the top features for me is the low smell and ease of cleanup. NR4000 Stains have ultra low VOC emissions with a low smell that doesn’t continue to linger for days.
While you still need to wear gloves to protect your fingers from getting colored with dye, a quick rinse at the sink or wipe with a damp cloth, makes it easy to touch other tools in the shop. Oil based stains are slow to dry and difficult to clean up and it’s easy to get a sticky mess everywhere.
All you need to clean up NR4000 is a little soap and warm water which is a welcome relief from needing mineral spirits to clean everything.
Best of all, NR4000 stains have zero hydrocarbons or ethylene-based solvents, so you can throw any used rags right in the garbage — you don’t have to worry about rags overheating and creating a fire hazard.
Part 2: Application and Topcoating
For most small jobs, a brush and rag are going to be the simplest and least wasteful method of application.
Simply brush on the stain and allow it to absorb into the surface a little before wiping off the excess with a cloth. This is a very similar approach to applying an oil-based stain and therefore familiar to many finishers.
For most projects you probably won’t need a retarder, but if you find the stain setting up a little too quickly, adding 5-10% SA5 Retarder to start, and up to 20%, can go a long way in giving you some extra working time. Large, flat surfaces can be more demanding and time sensitive, so adding retarder can really be beneficial.
Applying Water-Based Wood Stains with a Roller
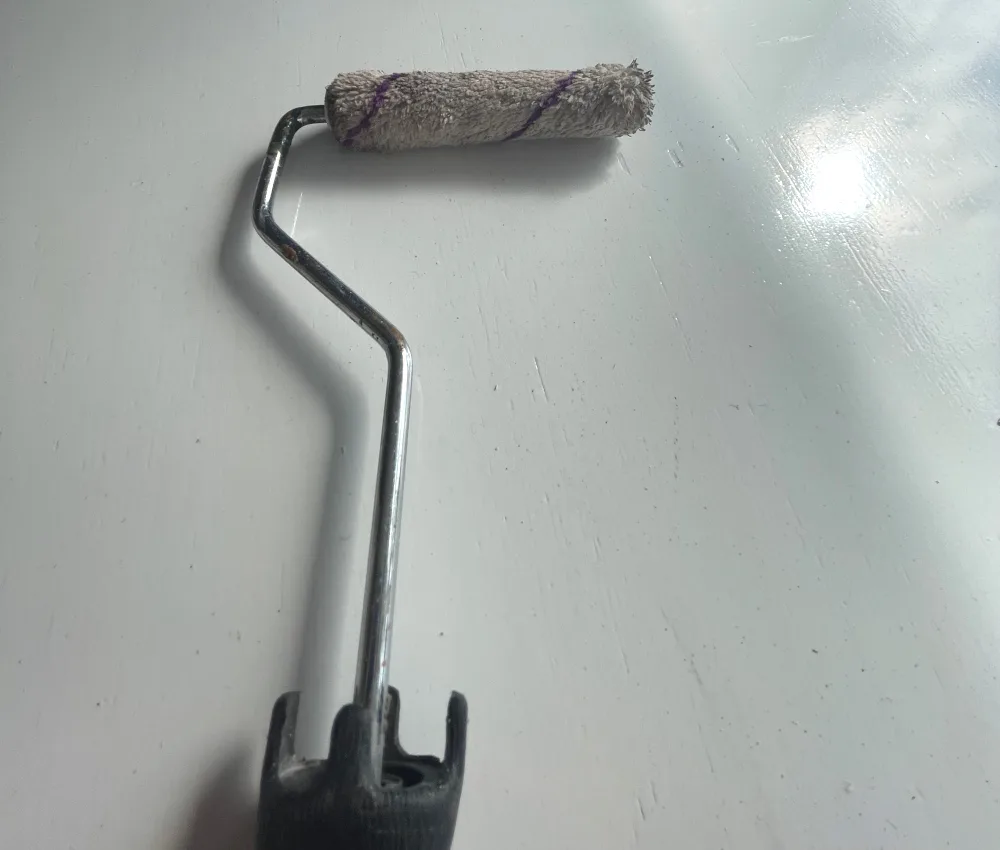
When using a roller, I prefer thin (¼”) nap microfiber roller covers for application. They lay out even and smooth coats without introducing too much air into the coating. Something like the 4” microfiber roller pictured below is perfect for small- to medium-sized projects like cabinet doors or coffee tables.
It’s best to work with the grain in a smooth and consistent pattern from one side of the project to the other. And once you start a project, it’s best to finish right away and not stop in the middle.
As you proceed across the table or surface, you may want to once or twice come back a few rows and re-roll an area to fully blend the stain and even it out.
This “backtracking” allows you to catch imperfections before they begin to dry and evens out the color that is hard to achieve on the first pass. With practice, this backtracking finishing method is very easy and could even be preferable to spraying on large surfaces.
Applying Water-Based Wood Stains with a Spray Gun
Application of the stain with a spray gun is fairly easy and straightforward. A slightly smaller tip size than what you’re used to using for Emtech clear topcoats will be preferable.
Small projects can usually be sprayed pretty evenly with a few light passes and a quick wipe or blotting with a cloth in areas that got extra stain might be all that’s necessary. Larger surfaces can be a little more difficult.
I have found it can be challenging to spray a perfectly even coat in one pass. Some finishers more practiced than me might have an easier time, but I always find there are a few areas on a large surface that end up with a little more stain than other areas.
So, I usually work these large surfaces in two or three coats. I apply a light, even coat for the first pass and allow it to dry 30 minutes before application of a second light coat.
The final result is usually more even in appearance, and by lightly wiping heavy areas to blend it all together, it will produce the most uniform color coat.
It’s better not to allow the stain to puddle on the surface, which can create light and dark patches. Because the stain is so soft and workable, you also really don’t want too much building on the surface. It’s better to work with light, even coats and gently soak or wipe up any puddles for a more uniform appearance.
How to Fix Mistakes
The best part is, the pressure is off either way, no matter the application method. If I end up with an unevenly stained area or lap mark I’m not that concerned…even if I don’t see the problems until the next day.
By creating a solution of water and alcohol mixed 1:1 and using a spray bottle, I can easily re-soften the stain and even it out.
If the stain has dried for a long time, it might be beneficial to use a white Scotch-Brite™ pad for moving the stain around easier, but between the water and alcohol solution, the white pad, and a dry cloth, I can fix any problem area in a matter of a few minutes.
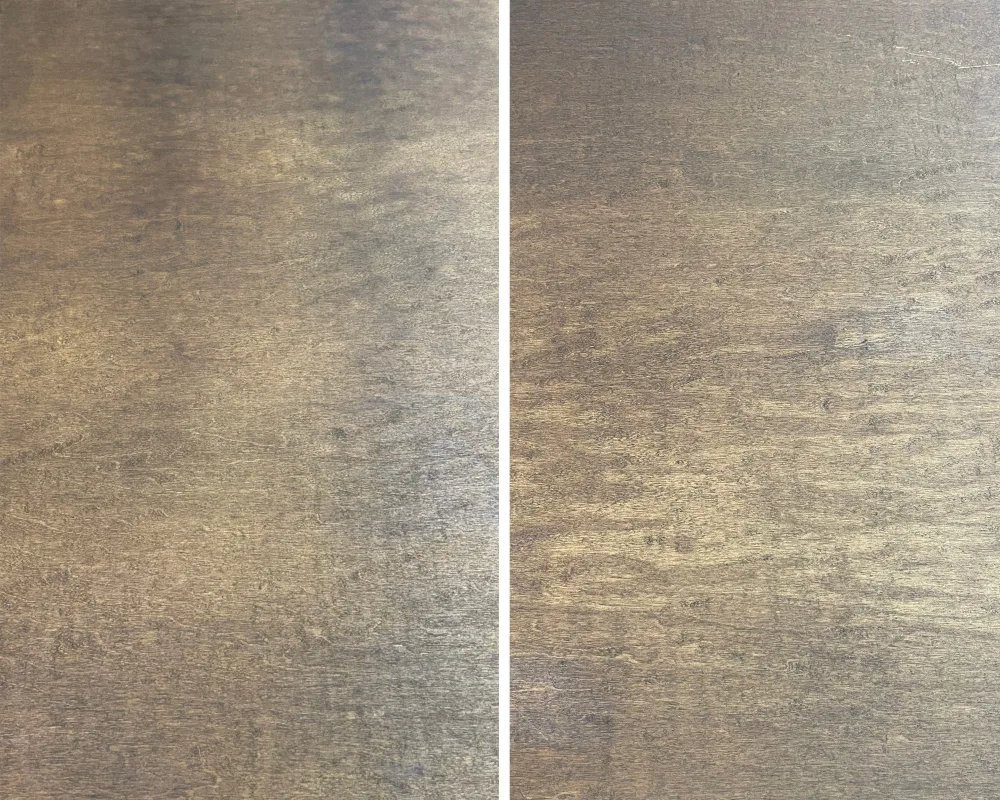
Below are before-and-after pictures showing stain allowed to dry on a board with lines and heavy areas…and then coming back in an hour to clean it all up before application of a finish.

Using Water-Based Wood Stains on Blotch-Prone Wood Species
What about application on blotch-prone woods like cherry and maple?
As I stated earlier, I find that NR4000 stain stain tends to do better on blotchy woods especially with a 20% reduction with distilled water.
However, it doesn’t get rid of the blotchiness completely, so if you’re a finisher who wants to minimize blotching as much as possible, I recommend you create a pre-stain conditioner using Target Coatings EM1000 Universal Sanding Sealer.
By mixing EM1000 1:1 with distilled water, you can easily create a wood conditioner that will even out the porosity of any wood type.
Simply apply a thorough and even coat of the wood conditioner and allow it to dry a minimum of one hour before application of your NR4000 stain.
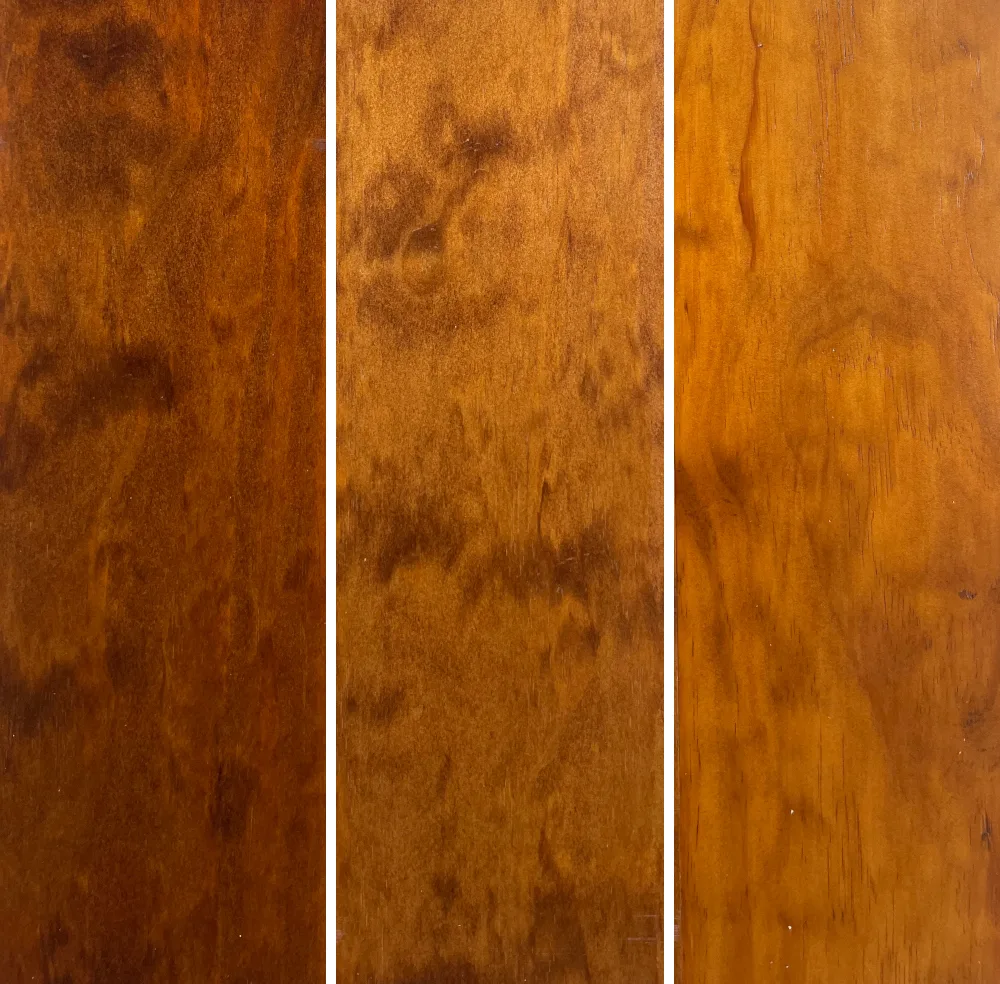
Two coats might be necessary on very porous wood grain. Here is a picture of each method…
Topcoating Water-Based Wood Stains
The easiest application method for topcoating these stains is with a spray gun.
Because the stain is so workable and water soluble, this can lead to problems while you are manipulating a brush or roller filled with topcoat on the surface.
Even when spraying, you need to be careful that your first 1-2 coats are not too heavy or you will lift the stain and create a blotchy and distorted mess.
With spray it’s best to apply one or two very light coats or “tack” coats. These coats will be around 1 mil thick and dry very rapidly, bonding to the stain, adding resin to the surface, and locking the stain into the wood pores.
I recommend you practice applying tack coats on a sample surface if you’re not familiar with this technique.
Once these tack coats are fully dry, you might want to do a quick sanding to knock off any fuzz or dust nibs and smoothing out the surface. After that, you can proceed as normal with your build coats.
How to Topcoat Without a Spray Gun
What if you don’t have a sprayer but you still want to use a water based stain? There are a couple techniques that can assist you with getting the same uniform results as with a spray gun.
First, sand your wood only to 180G for the best absorption and darkest coloring.
Then, apply only one coat of stain and fully wipe off all the excess. This method tends to have the lightest coloring from the stain, but most of the stain will be locked more firmly in the wood pores and brushing a clear coat on top will be fairly easy.
Allow the stain to dry overnight before topcoating. I would minimize the amount of brushing you do and apply a thin first coat so it dries quickly.
Second, you can beef up the amount of resin in the coating. This will reduce the amount of workability you get from the stain, but once it fully dries it will be more firmly adhered to the surface and harder to disturb.
You can add resin to the stain by adding 20-30% by liquid volume of EM1000 Universal Sanding Sealer. Again, you will have to be more purposeful with your stain application and it will be harder to soften the stain and move it around once it dries, but this will greatly improve your ability to brush and roll over the stain. You will still need to apply a light first coat and minimize working the surface.
Third, and possibly the best option is to apply a simple barrier coat. You can use Zinsser SealCoat™ mixed 1:1 with denatured alcohol, or a 1lb. cut dewaxed shellac, as the barrier coat.
The shellac does not interact or pull the stain at all, and once it’s dry the stain is locked on the surface and it’s very easy to apply a clear topcoat.
One coat is usually all that’s necessary. Allow a 2-4 hour dry time of the barrier coat before application of your favorite Emtech topcoat.
In the picture below, you can see the dramatic difference one coat of SealCoat™ can make.

An Update on Using EMCAT+ Si427 Sealer / Isolator
After doing the initial research for this article, I was asked to run some experiments with the new EMCAT+ Si427 Sealer/Isolator.
My previous work with Si427 was with spray only, so I was intrigued by the idea of diluting the Si427 with water and applying it over the NR4000 stain with a roller.
I diluted my Si427 60/40 with water and, using a microfiber roller cover, I applied the sealer over the stain that had dried overnight. I was very surprised with the results.
Emcat+ Si427 did not pull or lift the stain similar to the application of the shellac coat. It also soaked into the wood and leveled beautifully.
I would say that if you are looking for an all water-based solution and need to use hand application techniques with the stain, Si427 would be the way to go.
I would even recommend it for spray applications over the stain because it will not interact with stain as much as the Emtech finishes and therefore a first tack coat is not necessary.
Currently, Emcat+ is only available to TCPro members, so if that’s you, and you’re working with NR4000 stains, by all means take advantage of this new product.
When released to the general public this will be a game changer for hand application over a water based stain.
It is important to note that Si427 does need to be fully dry before application of an Emtech clear topcoat. We are seeing at least an overnight dry and up to 24 hours depending on the drying conditions.
Part 3: Creative Ways to Use NR4000 Water Based Wood Stains
Another use for NR4000 Stains is by adding them into EM1000 (or any clear topcoat) to create a base color coat or toner.
For a light toner, NR4000 can be added at 5% by liquid volume to any clear topcoat to create a light toner that can adjust any color to keep your base coat looking even and uniform, especially with high film builds.
And this technique can also be useful over dark colors when, for example, you are clear coating black for a glossy finish or making spot repairs to even out the color on a project.
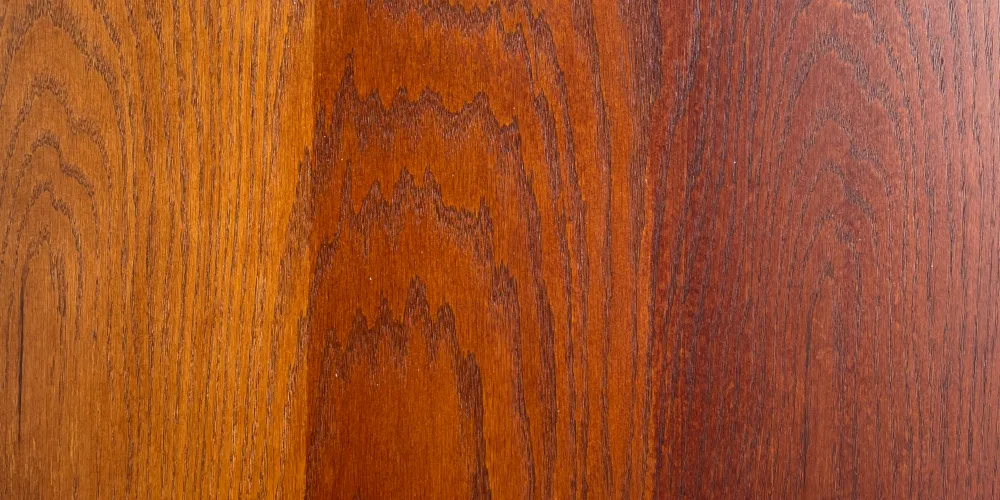
When you want to create darker but still translucent colors, you can add NR4000 by any ratio you prefer into EM1000 to create a custom base coat system and color that works for you. In the picture below, I added NR4000 Golden Oak 1:1 with EM1000 and applied 1, 2, and 3 coats.
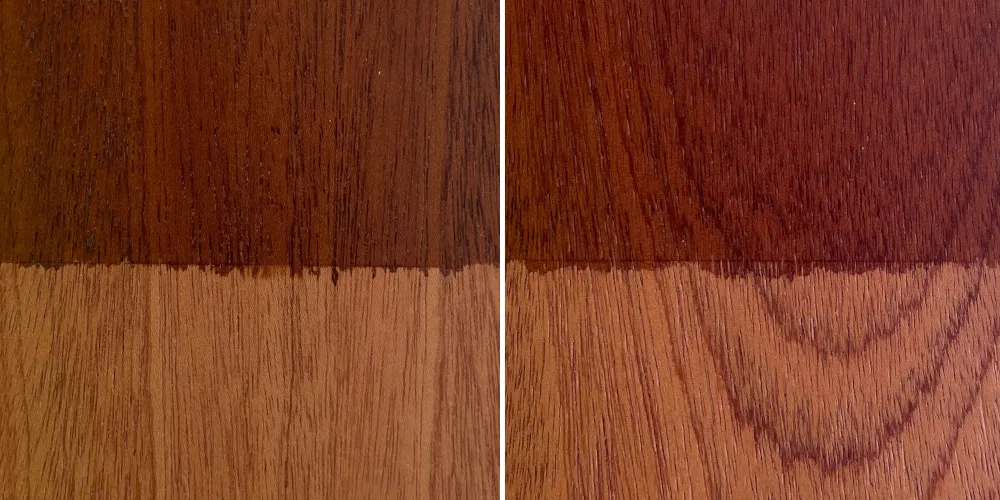
It’s also important to note that NR4000 does not always need to be used as a stain on light woods — it can be used on darker woods, such as African Mahogany or Sapele, to give a more uniform and luxurious appearance.
In the below pictures, I used darker stains to create an aged and more stately appearance to the wood.
Finally, NR4000 Stain can also be used as a toner on its own to even out color variations in grain.
Cherry wood is an example that will occasionally have white streaks as you near the sapwood of the tree. So, to blend your boards together and give them a more uniform appearance you can use NR4000 Cherry Toner.
As you can see in the photo below, the toner gave this cherry board a more uniform and clean look.

As you can see, NR4000 Stains have multiple uses and functions to support your creativity.
They eliminate the smell and hazards of oil-based products while enhancing and/or accentuating the beauty of your projects.
Using them is a great way to level up your projects, but keep your environmental impact low.
What are your thoughts on NR4000 or water-based wood stains in general? Please share your thoughts or read what others are saying in the comments section below.
Seth Kline has been a woodworker, wood finisher and business owner for the past 25 years. After helping grow his family’s home remodeling firm — Roy B Kline & Son — both as a craftsman and business operator, in 2013 Seth became the co-owner, lead woodworker, and shop manager of Stor Handmade Furniture, a highly successful solid wood furniture shop specializing in bespoke, hand-made and hand-finished pieces. In 2023, Seth launched SBCraftsman, which offers spray finishing and small business consulting to private clients. Originally from Pennsylvania, Seth now resides in Aberdeen, N.J., and is a proud member of the Central Jersey Woodworkers Association.


I can get a great result with water base stains on an individual piece, but is it reasonable to use it on an entire set of kitchen cabinets and get a consistent result?
Hi Joe,
Thanks for your comment. Due to the fantastic workability of these stains, I do think it’s reasonable to work an entire kitchen. It does take a little practice to get used to the faster drying compared to oil stains especially on large projects. However, these stains re-soften easily with a water alcohol solution and make it almost fool-proof.
-Seth Kline
In the above guide you state that water soluble dyes should be premixed before adding to the clear base at what concentration would you suggest. I am interested in combining dyes such as the Lockwood brand to the clear base
Thank you
Ed
Hi Ed,
Thanks for your comment. I would mix your concentrates with as little water or alcohol as required to fully dissolve the dye powder. The dye powders will not incorporate properly into the NR4000 stain so it’s important to get them in liquid form. If they are mixed in alcohol, you’ll want to mix them in a little warm water first before adding to the stain. If they are mixed in water you can add directly to the NR4000 stain for color adjustment.
-Seth Kline